Tuesday, January 31, 2012

A Quickie Collar

Leaving work heavy heeled to the first open bar? Look a bit more relaxed and tuck that collar in for a more flirty feel. It can give you a lower neck line while completely changing the look of your outfit.


This also works well with outfit repeating..


Give it a tryyyy.


Monday, January 30, 2012

Youthful lookin' YOU

..long were the days that our faces would factotum a fadaise of foul play. With spring coming up, its all about the fresh faced fun. But, lets be honest...we arent all blessed with flawless skin. Here are some of the tricks we use to ignite a glowing conflagration. 


We opted to shy away from photoshop just for you..

Oil of Olay: Before I begin anything i ALWAYS ALWAYS apply a non comedogenic lotion all over my face. My mom has always used oil of olay, so I suppose it was genetically gifted to me as well. I use Oil of Olay Complete All Day UV moisturizer for normal skin with SPF 15. Ill let this sit for about 5 minutes or until its nearly dewey, while the skin absorbs the lotion's vitamins.  


MAC Prep + Prime Fortifying Skin Enhancer: Yes, Im fortunate enough to have a beautiful sister as a makeup artist for MAC and she always points me in the right direction. Until using this miracle worker, I found that my makeup started caking around my checks and nose area throughout the day. MAC has completely eradicated that issue. This primer goes on just like lotion and literally makes my skin look flawless for days-if I decided to leave it on for that long. Ill let this sit for just a few minutes before applying my  makeup.


Bare Minerals: Depending on the day- if im running errands or attending a party (which is rare), ill either just use mineral veil or their loose powder/foundation. I obviously use the color "fair." For those of you with sensitive skin or irreconcilable breakouts, I would really recommend switching over to mineral makeup. Its much lighter on skin and can decrease your number of breakouts. 


MAC Pigment-Bright Fuchsia Frost: Now here is my secret.  Instead of using a matte blush, I opt for loose pigments or shimmery colors on my checks-wether those be shadows or blushes. MAC's bright fuchsia is something I think I could not live without. It definitely gives me that glowing pop I need to have on my fair face. Find this survival gem by clicking here.


After I complete my founded new look, if I see that my makeup doesnt look a la natural I do one of two things; 1. I will take a blowdryer on low heat and blow out my face for a few seconds. This allows my face to absorb the makeup as opposed to having the makeup just sit on my face. If im feeling energetic, Ill do a few jumping jacks, squats, or sit-ups to get the blood pumping. 


Eyes: My shadow colors vary day to day but for the sake of being consistent, ill tell you what was used in this picture. I normally like to mix matte colors with shimmer. However, for a glowing face, I prefer shimmer on eyes. In this picture I used TooFaced fashion on the base of my lid. On the inner corner of my eye, I used Nude Beach and followed under my eyes with that color as well. On the outer corner of my eye I used Honey Pot--all colors by TooFaced, which came in an amazing palette (Natural Eyes Collection) given to me by a wonderful TooFaced rep. This has become my new obsession and I recommend any girl to buy this. These browns are perfect for ANY face. I topped off my look with TooFaced Size Queen mascara. To make this look more drastic (a la day to night) try adding Urban Decay black pencil liner into the mix. MAC engraved and smolder are also a few of my favs.

Friday, January 27, 2012

Oh, The Marvels of Mascara...

Two Items that we both have agreed we could not live without are chapstick and MASCARA.


Mascara can easily make or break a fresh faced look. However, why is it that the perfect mascara for our eyes has yet to be found?
Check out our favorite lash go to reviews:
1. 
Too Faced Size Queen (Sephora, $21)
     Tee: I love this mascara mainly because it makes my lashes look natural. It never hardens no matter how many layers I put on, its dark and thick but appears light and and airy. Size queen provides a full look as well as elongated my lashes at the same time, which I find to be a combo rarity. Things to look out for: The wand on this bad boy is HUGE. Im talking HUGE. It will take some time to learn how to apply this mascara on your lashes. This may  not be the best fit for those of you will short or thin lashes. However, for those of you with lashes that resemble mine, it is impossible to catch the spider syndrome with this mascara. I love using Size Queen with just a loose powder on my face. I let the lashes do all the talkin'. 
Size Queen used in picture. 
2. 
Too Faced LashGasm (Sephora, $21)
      Tee: LashGasm is my go to when im experiencing stubborn lashes. The wand is tiny and detailed. This is PERFECT for exposing every bottom lash. The mascara is gentle and super black! Things to look out for: May slightly harden lashes. 
3. 
Christian Dior DiorShow (Sephora, $24.50)
     Ash: This mascara is my all time favorite.  It never makes my lashes hard, but curls and adds length and volume to my rather spares lashes.  It's super hard to get my lashes to curl, but this mascara effortlessly makes my lashes look amazing! Downside: Expensive, but worth it!
4. Urban Decay Skyscraper (Sephora, $20)
     Ash: This mascara has a great brush for definition.  I use it in combination with Falsies to prevent my eyes from getting that spidery look.  It works great for bottom lashes, and defines top lashes.  Downside: Hardens lashes. 
5. Maybelline Falsies (Drugstores, $6)
We can't always afford to indulge ourselves with a $20 or $30 tube of mascara, so this is what we use in combination with our favorites, or just to get us through a tight squeeze.  


*It should be noted that that in case of emergencies (when we know we are being photographed or going out) we opt for luscious lashes. Yes, this may require a bit of spider syndrome- long, hardened lashes. For this look, I often refer to Maybeline's Define A Lash and double extension lash by L'Oreal. We first prime our eyes with double extension, then use the mascara side of the tube. Ill top it off with define a lash to get those last little centimeters I need to pull off a showcased look. 
Reasons we dont use Define A Lash alone: The first few weeks of this baby are brutal! The mascara is thick, watery, and literally paints on ALL over our eyes! Yes, terrible. However, if you can withstand those first few weeks define a lash turns out all right. It may not provide you with the fullest set of eye strands, but it definitely elongates each strand-in time. 
wearing Define-A-Lash and Double Extension

Thursday, January 26, 2012

rainbow regalement

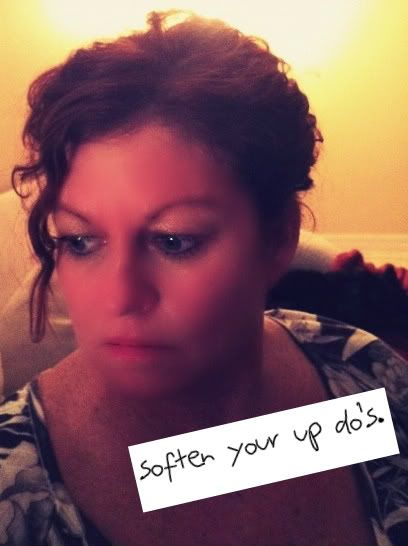
the perfect proximal permutation to your ombre, why not add a little color and spice it up? Our dhh fans have been asking how to get this on their head, so here's a quick and easy tutorial!
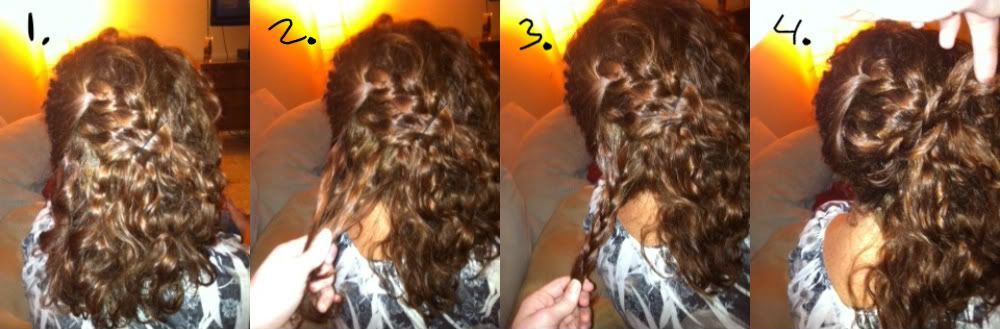
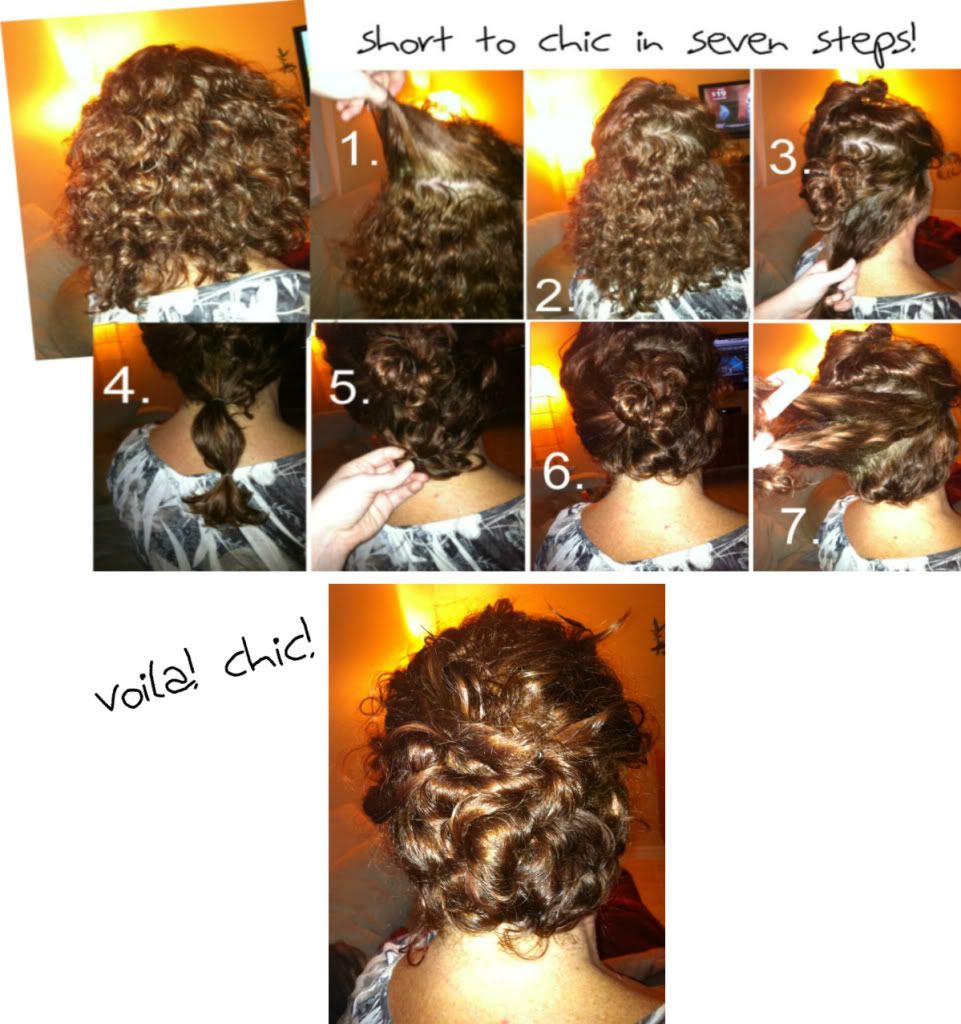
1. 
I started with my hair already "ombre'd", so that the ends were already bleached/lightened from a few months ago.  if you are starting out without lighter ends, note that you will need to first use a highlighting kit, and use our tutorial here to lighten up those ends, so that your color will display properly.
2.  
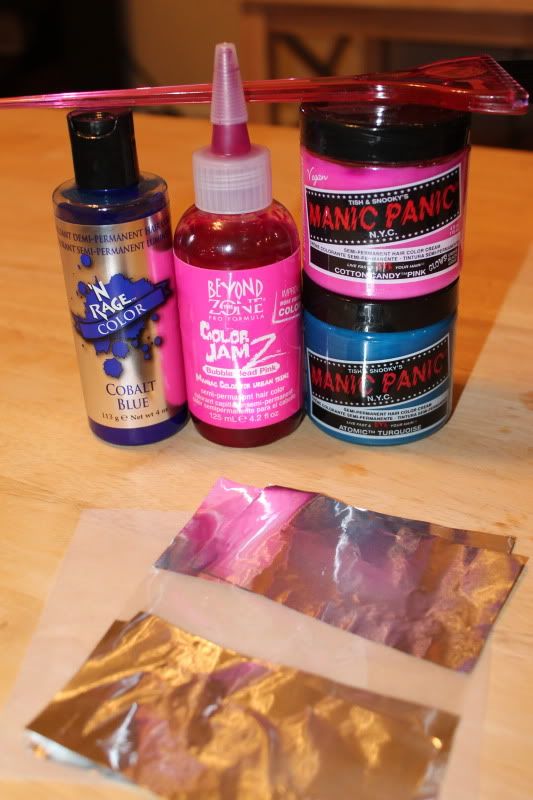
here are the tools you will need: a color brush ($1.99 from your local beauty store), highlighting foils (I got a package of 35 for about $3), and then your color!  I chose to get four shades - two blue and two pink.  i got a light and dark blue, and then a light and dark pink, so that i could create a blending effect.  feel free to get creative and use whatever colors strike your fancy! i cut my foils in half, since i was only highlighting the ends, and it seemed to make them much easier to work with.  i also got these pretty sweet foils that allow you to see the color through the foil. 
3.
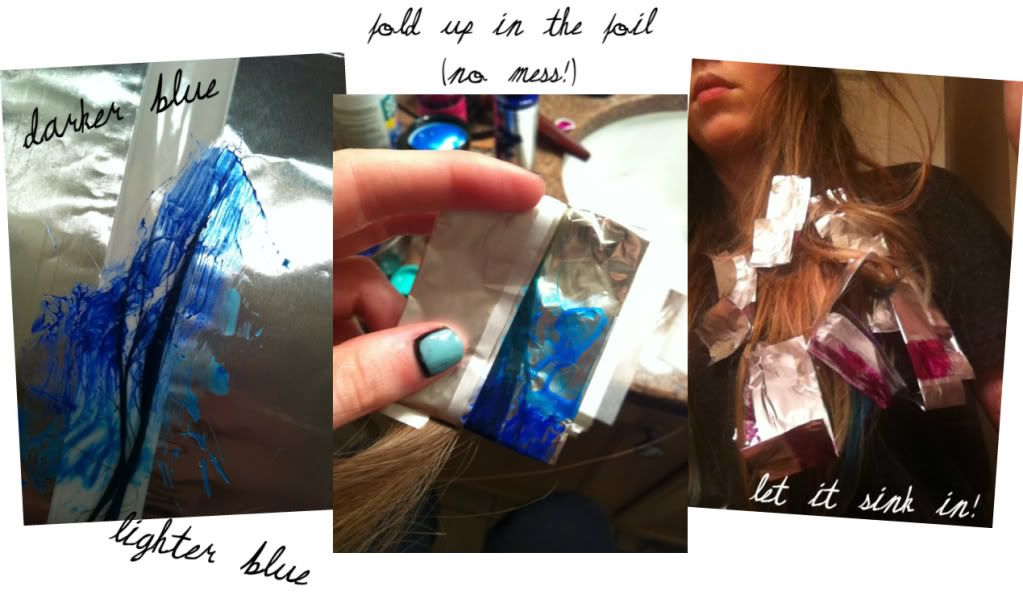
to start, i sectioned my hair off with a clip as i would when straightening or curling it. i started with the bottom layer and worked my way upwards.  i did one color at a time, so that i could use the same brush the whole time and used random selection to chose what pieces would be painted blue or pink. 
4.
i randomly chose pieces that i wanted to highlight, of about the size you see above, and set them on the highlighting foil.  starting with the light blue dye, i then used the brush to add the color at the top of the piece (closer to my roots).  i then added the dark blue dye starting from the tips/ends, blending the two together where they met. i used more of the darker dye on each tip. (the great part about this is that it doesn't have to be perfect - messy lines look much better than straight ones here! i also tried to make sure i was putting about the same amount on each side, so as not to be lopsided in color. )
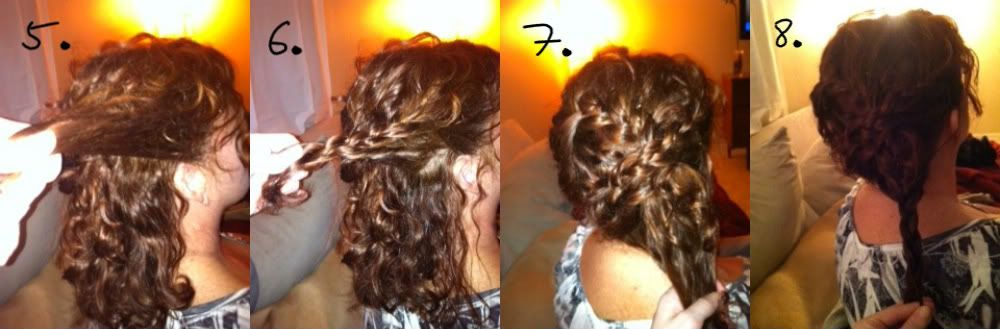
5.
i continued this around my head, pulling the hair forward to make it easier to reach.  this way, i could get the back of my head as well. 
6. 
i left the blue dye in for about 45 minutes, then rinsed.  (my hair takes longer to pull color - the instructions said about 30 minutes) 
7.
i waited for my hair to dry, then repeated the process with the pink.  
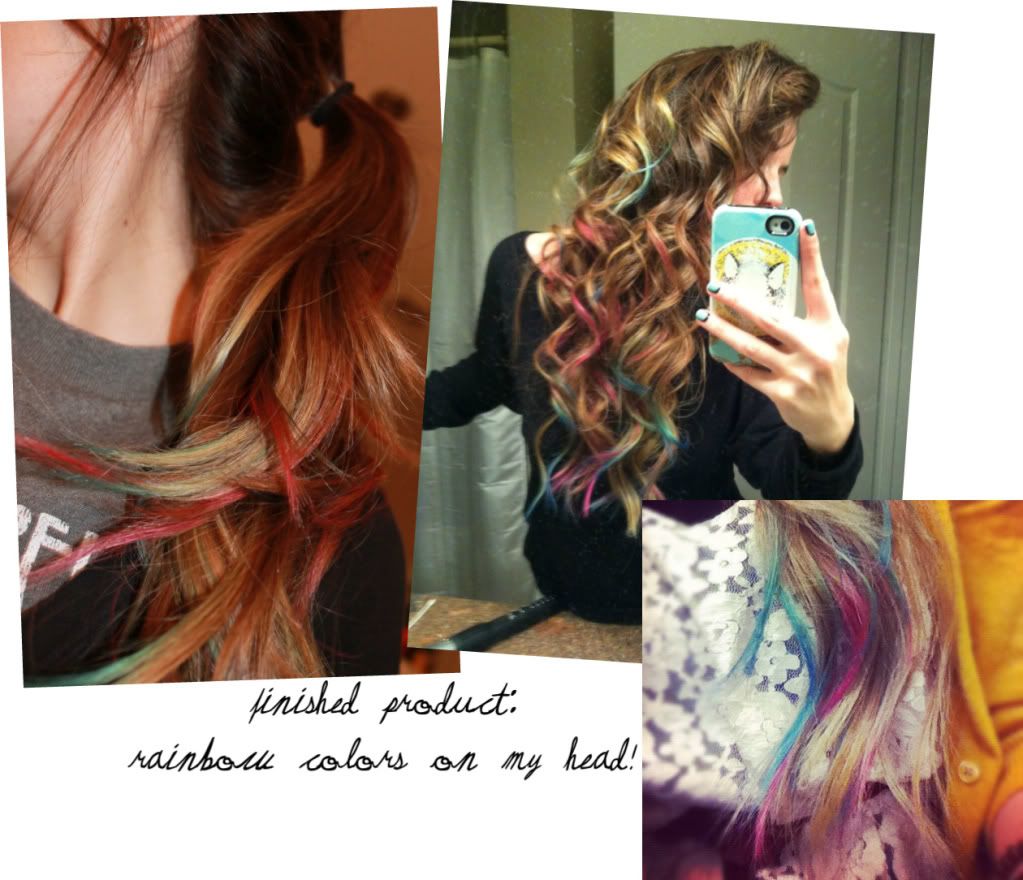
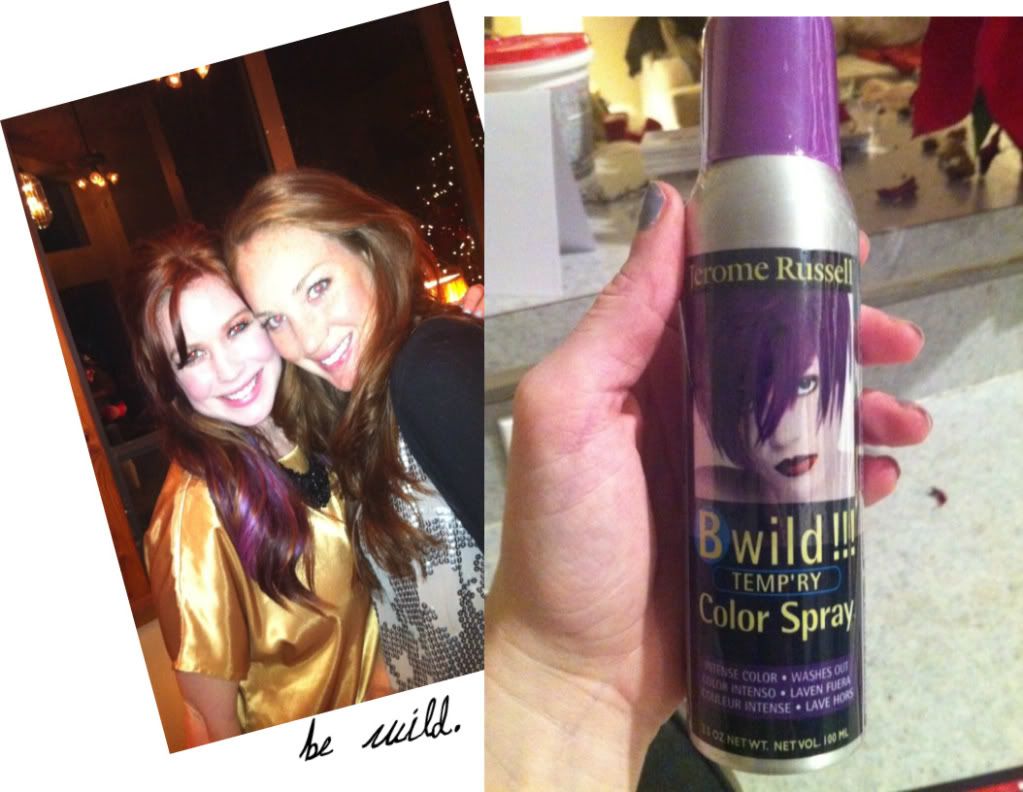
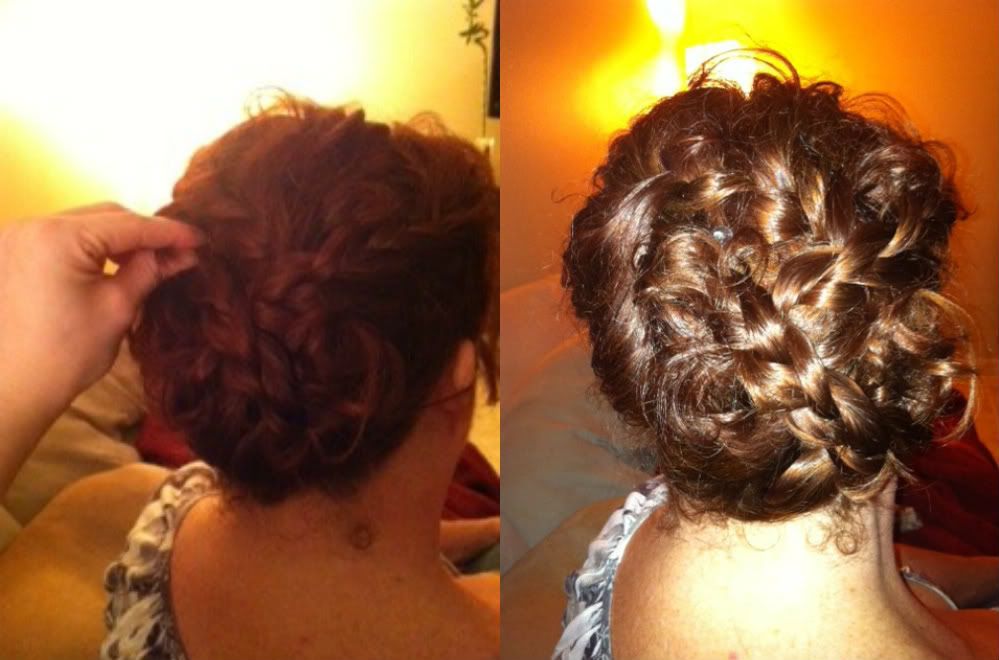
don't be timid about this hairdo (its goof proof!) - the semi and demi- permanent dyes wash out in 10-12 washes.  if you want to preview this look on yourself before you go for the real thing, try out a spray in style, found in most beauty stores in the same aisle alongside the color dyes! Check out the Purple Spray Tee used. This was a one time wash out. 


Tuesday, January 24, 2012

X-ccentric

Wellccommmee back!


Here is our continued updo how to for short or curly hair (dont fret long haired lover, these looks will work for you as well.)


1. Think 4 corners, you will make 4 sections of hair.  Start by Pulling your hair half up, half down and split that section into two, the bottom half will do the same. 
2. Take the first section and braid the hair. Stretch the braid to its opposite corner and pin in place. 
3. Take the bottom section of hair under the section you just did. Braid this piece, stretch across to opposite section of head. Your hair should form a X. 
4. Take the remaining section of top hair and braid it, stretch it across to the opposite side. Pin in Place. 
5. Take the last section of hair, Braid it, stretch it across and pin in place. 

Thursday, January 19, 2012

twin tints

Two tones of color on your nails are twice as nice! Bored with the endless drone of manicures that are out there, we opted to try something different.  As much as we love layering clothing, we thought - hey, why not try this with our darling digits?


Feel free to get creative with the color combos - I'm already anticipating my next amalgamation. 
1. Start with a clean, polish free set of nails.  
2. Paint two thin coats of black polish.  (Or the darker color - not necessarily black!).  I used a Sally Hansen color called Black Out, which I conveniently removed the label for, so I have no way of telling you which type it is. 
3. Let this coat dry COMPLETELY.  Don't get antsy, or you will end up with mixed polish! I recommend painting this first color with Essie's Good To Go - It helps set the polish much more quickly.  
4. Next, paint your top color, but leave an edge around this second color by painting a smaller space - this gives the illusion of a line around the color, without having to paint the line!  I was sick of seeing dark colors on my nails from winter, so I opted for a vibrant Matte Green 1 from Urban Outfitters' polish line. Allow to dry. 
5.  Paint a top coat - I used my Essie a second time here.  (I didn't want the color to be Matte, so I made sure I used a top coat.)

Tuesday, January 17, 2012

Up and Out

Several of our readers have recently requested easy updos for short and curly hair..and like the loyal Hippies we are...we have delivered.


Check out this  easy exercise below.


1,2,3. Youre going to part your hair in three sections: A top, Middle and Bottom.
4. Put the bottom section in a Pony Tail, as you will be working with this section first.  Add another hair tie in the middle of your pony tail.
5. Take the end of your pony tail and roll it under. Having the rubber band in your pony tail will make it easier to roll under.
6. Clip in place when you are done.
7. Take the Middle Section and split into two sections. Next, and what is NOT pictured here (we do apologize) split those two sections that were once your one middle section down the middle. So, you would now have 4 sections. Start with the bottom left section and twist the hair across to the right side of your head. Pin in Place. Do the same with the right lower section. Pin in place. Finish twisting the top sections of the left and right sides. Also Pin in Place. Take the top section of your hair and just pin that in place as it is in order to keep volume on the top of your head- as this top layer is generally shorter than the others.


Keep in mind that you can do as many or as little twists as you want depending on your hair type- some may have thinner hair than others. All this style requires is a simple twist and pin!


Tune in next Tuesday for another Short and Sassy do! 

Thursday, January 5, 2012

Hippie New Year!


we would like to wish all our dirty fans a hippie new year :)  2011 brought us the cliched fate, fortune and above all- YOU! Rock it hard in 2012. 


About our NYE outfits:
Tee Silk Blouse (Thrifted), Leather Pants (Thrifted), Fringe Wedges (Jeffrey Campbell)
Ash Beaded Top (Thrifted), Skirt (BDG, Urban Outfitters), Mary Roks Wedges (Jeffrey Campbell)
Hair by bumble&bumble

Tuesday, January 3, 2012

prodigious pairing

it's no secret that we love shoes.  (love being an understated word here.) However, with less surplus monthly, it leaves little room for the copious amounts of footwear we'd love to have in our closet. (admittedly, dreams of a bedroom as a shoe closet are a feeble daily topic...)


Sad as it may be, we are resigned to our destiny as lovers of fabulous footwear, and when we find a great deal, we can't help but share it.  Target has really stepped it up when it comes to foot finds.  You can't beat their prices, and our convulsing hearts ached when we saw these great deals at a fraction of the designer cost.


check out our new footwear, and our inspo to wear it, and then head to the nearest Target (or Target.com) and grab yourself a pair (or two..or four...) before they are all sold out!
1. Target - Clearance - $20
2. Target - $29.99
3. Target - $29.99
how we wore it....