labels

Showing posts with label hair. Show all posts

Wednesday, November 14, 2012

Hair Inspo

Everyone has a style inspiration.  My hair inspirations come far and wide when determining what sort of style and mood I am seeking. 

However, little miss Julianne Hough has completely stolen my heart with her audacious hair styles lately. She is smokingly adorable and never fears changing up her look! 

Here are a few of my J-Hough favs. 

she has the ability to make updos look remarkably effortless and romantic. 
LOVE braided updos. 
Julianne at the Twilight Premier. This one of my FAVORITE looks of hers. Daring, gorgeous and completely stunning. 

Im sure in these upcoming weeks I will be learning how to recreate these looks. Hopefully this goes well so I can teach  my fellow Dhh-ers! 

Thursday, October 18, 2012

Box Up Your Color

For the past year and a half, Ive been dying my hair myself. Sometimes, I opt to pick up a custom box dye sans developer at Sally's and other times, I head heavy healed to the nearest drug store to see what the shelves have in store for me.. 

Now, coloring your hair from a box can be tricky and I definitely do not recommend it for those of you who are attempting to pull lighter stands. This is for the dark hearted only (sorry blond babes). 

Any dye, whether it be box or salon, has chemicals in it. It will damage your hair. Now, going to a salon, a colorist will have the ability to perform a personal analysis on the condition of your hair and select a color in order to accommodate to your stressed tresses. Color in a box, unfortunately, does not have this luxury...as we all know. 

However, making a trip to a salon is no longer an option for me since ive traded my life for higher education. Thus, box coloring has been espoused so forcefully into my life--and im not complaining. 

Box coloring IS damaging. Let me stress that again. So, please, keep in mind that you should probably take precautions with your hair before and after the dying process. Try to do a strengthening masque before and after. Color dries out your ends. Do you what you can to keep those beauties hydrated. I sometimes put a drop of olive oil in my condition or use a weekly repair treatment called MENDING from B&b. It has worked wonders on my staple hair. 

BACK TO COLORING: Ive learned that the average developer in a box is at a 40, this means it lifts your natural color and deposits the color in the box (developer is that cream based conditioner looking stuff you mix the color with). This is what is very damaging. So, upon purchasing a Box dye at my local CVS (Revlon's Dark Auburn..it was 2 for 6 bucks, couldnt walk away from that deal, obviously). I decided to purchase my own gentle 10 developer as opposed to using the 40 to be less damaging on my ends. I emptied out the squeeze bottle that came in the dye and filled it half way up with my developer and then placed the color in. Mixed it up..and you know the rest.. 

Please remember: Your roots are vulnerable to color! So make sure to go a level the same color or darker than your roots (levels are the numbers usually listed on your box. EX: Dark Auburn 4). Here is the scale (1 is BLACK, 10 is BLOND..I usually use a level 4 on my hair). I recommend level 4 and 5's for medium browns and Ash tones. 


Wednesday, October 10, 2012

French your way to the top.

It is VERY rare that I dont style and wear my bangs daily--they are my security blanket and I almost feel alien without them. 

However, because I spend the majority of my day studying, those bad boys need to go up and out of my face. 

Now, I can pretend that I thought of this style all on my own, Buttttt I didn't. I stole it from my dear pal, pinterest. 


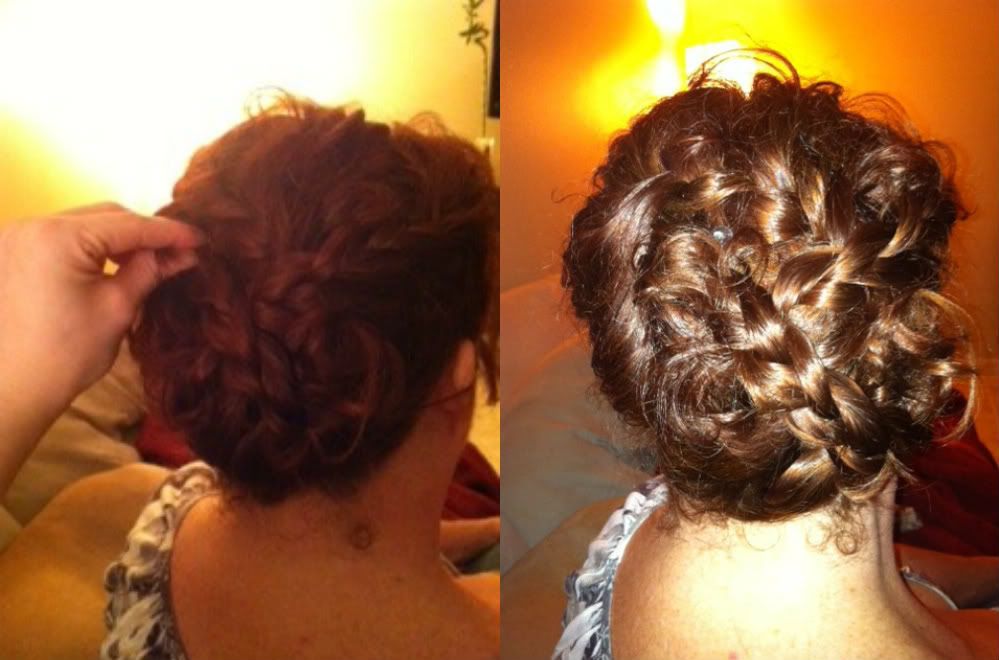
I did my bun lower on my head than a normal styled bun for a few reasons. First, I wanted to get the look of an elegant updo from the front. I wanted some height on my head, a la celeb style. Two, I have such heavy and thick hair. After thirty minutes of rocking a bun, its migraine central. 

This style took me about five minutes and even for your anti-braiders out there, I have no doubt that this look is fool proof. 

Here is another front view picture (I know, redundant) but I wanted you to to see the effectiveness of the "updo" illusion. 


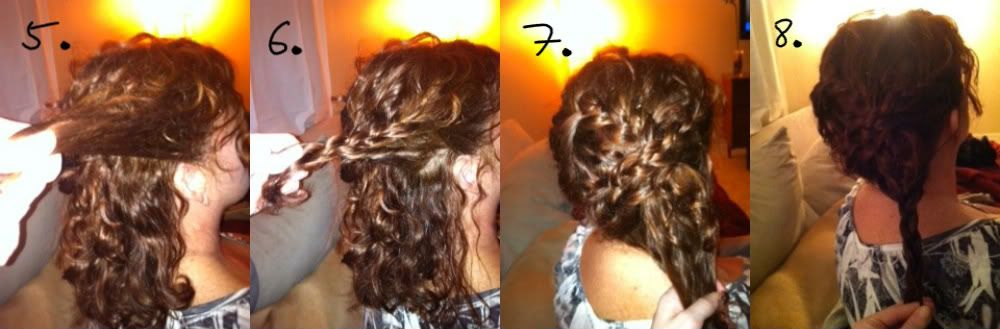
Don't know how to french your way up to this bun? I included a quick guide below! 


Wednesday, October 3, 2012

Don't Wash, just use Dry...Shampoo


I think by now, we all know that one of my absolute can't-live-without products has to be dry shampoo. Each week, my shampoo longevity rules goes longer and longer. Sick? Somewhat. Efficient? Absolutely. 

I will never deny that I hate washing my hair and being a Florida girl has kept that perilous challenge of an anti-shampoo life a mere battle. 

Here's the deal, my hair holds moisture. Seems normal. However, living in a danger zone of humidity..equivocates to a nightmare. My hair looks damp with every second I step outside. Dry Shampoo is a dyer must have. I cannot stress that enough. 

Thus, this leads me to Suave- Keratin Infusion Dry Shampoo. Yes, I know, it is very seldom that I leave my precious b&b products behind. However, this dry shampoo ROCKS. It adds lift to my hair, smells like a bed of spring flowers, and leaves my hair lookin' flyyyyyy. For four bucks...this has been my complete budget saving savior! 

Here's the only downside, this dry shampoo is SUPER white. So, for those of you with dark hair, beware of the spray. However, this reckless white sucker does easily set in with a few finger rubs to the scalp, not to worry. Plus, the product isnt super thick like its competing brands that leave your hair feeling even dirtier than before. This product is really, just completely convenient. 

Stop by your nearest drug store or super market and try this baby out! 

My Tip for Dry Shampoo: Put it in at night. When you wake up, your hair will look more voluminous! 

My hair is three days old in the picture above. Notice: my curls tend to get a bit sloppier as the days go by...but my roots are lookin lifted due to SUAVE!


Wednesday, August 1, 2012

Werk the Waterfall

Its time to end this summer with what has been flooding its way through pinterest one braid at a time. 


True Braided Waterfall!


Now, we have shown this braid before using two strands here...so, now lets get intermediate and try a third strand!


Follow these simple steps. 


1. As if youre pulling your hair back to go half up half down, pull a good chunk of hair and start your braid crossing over three strands once. 
2. Next, Take chunk of hair from the top of your head, and place it inside the braid, like we did in our previous post linked above. 
3. Cross over each strand (once) just like you are creating a normal braid, then grab a new strand from the top and slide in into the braid again! 


Check out this summer variation below, just add a bun! 


Sunday, July 8, 2012

Surfer Straight

Normally, my day to day hair routine involves, very little hair brushing, Bumble & Bumble's Spray de Mode, and and a few ounces of surf spray. However, today I opted to go for a big straight blow out and switch it up.


The key to getting big, straight hair is texture. Its all about texture. Now, while I can use BB surf spray to play up my waves, I also like it spray it in my damp hair and give my locks a good heated blow.  The texture makes my hair bigger and more susceptible to the florida humidity.

Heres what I used on my damp hair...


1. Bumble&Bumble Surf Spray
2. Bumble&Bumble Thickening Spray
3. Bumble&Bumble Tonic

I mixed in the product and literally blew my hair out, away from my face. I gave myself a deep side part to blow dry half of my hair, then flipped to another side part of the other side of my head to do the other section. I also flipped my hair upside sprayed it down with BB spray de mode, and flipped it back up to fix up with my fingers.

The key was to quickly run a straightener through the ends of my hair afterwards so I could still have body with a slight refined straight look.  This means, i barely used the straightener ONE time through my locks.  Let your layers do the talking...

Monday, June 25, 2012

the bun is in the eye of the beholder.

being that we are being hit by tropical storm debby here in the "sunshine state", we need an easy go-to updo that won't fuss when it gets pelted by storm force winds and rain.  the solution? our favorite, a braid - but a bit better!


follow these easy steps to have a beautiful, braided bun in no time. this look is perfect for a sophisticated corporate workday, or a night out on the town.


here's the look, from my night on the town (a braided bun paired with grunge):
photo [kevin kelii / kk photography ]
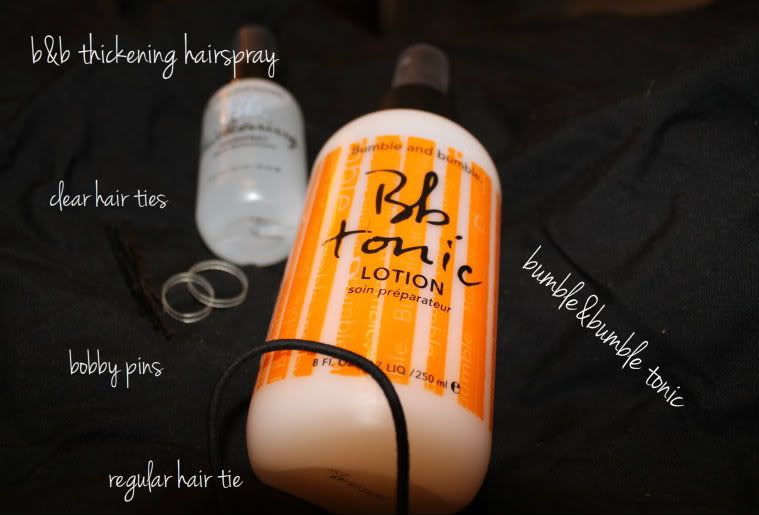
here's what you need to get it:


here's how you do it:

1. while hair is damp, spray tonic and thickening hair spray on roots, lightly. 
2. allow to dry, or blow dry.
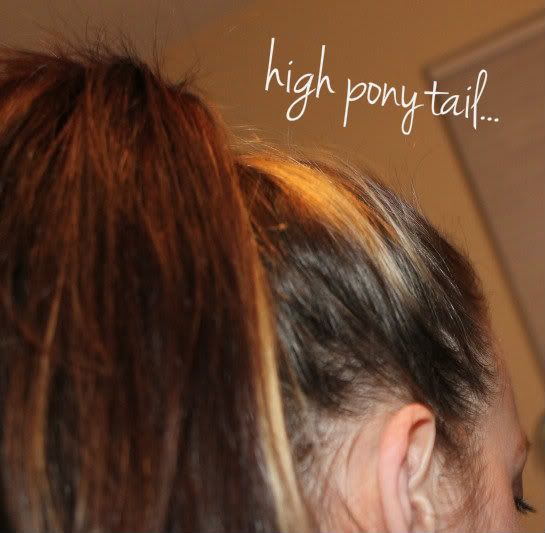
3. put hair in a high ponytail.(or low...you can also do this style at the base of the neck!)
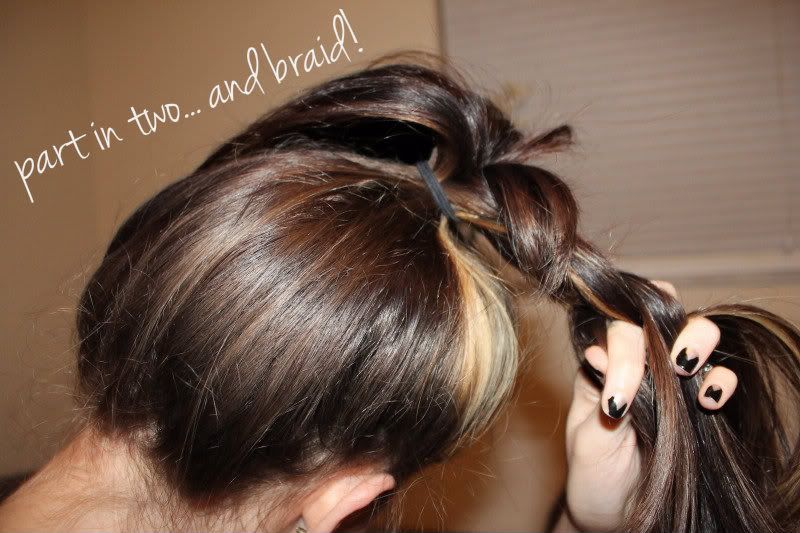
4. separate into two sections.
5. braid each section tightly, and secure each end with a clear pony.
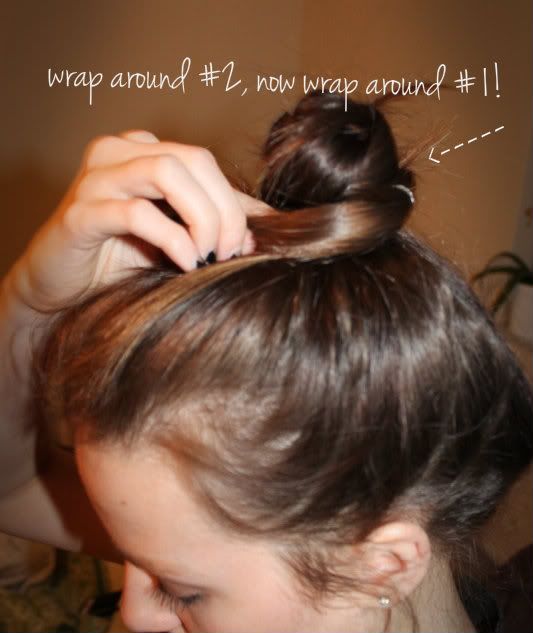
6. take one of the braids (#1) and wrap it around the remaining braid (#2), until braid #1 is fully wrapped around braid #2. pin in place. 
7. Now, wrap braid #2 in a circle around the bun you just created, making it thicker.  
8. pin in place and voila!


as you can see, I have many layers, leading to lots of stray hairs. to get a more refined and polished look a la the first photo, use bumble&bumble tonic and thickening hair spray to hold those babies down - and rain will only help your fabulous look!

Thursday, June 7, 2012

Boho Beauty

Its been sometime since weve done a hair post...I apologize in advance for leaving you all stranded (ha, pun intended. Funny, I know)


So, finally, here is a simple five stepper. We couldnt help but be inspired by the marvel that is Mary Kate Olsen.


Directciones for the Die Hard Dirty...Hippies..


1. part your hair down the center
2. pull your hair up to pig tail status- yes, that high.
3. braid your pony.
4. pull the braid up and over to the other side of your head.
5. pin in place.
6. do the same on both sides.
7. We highly recommend you pin the two braids together in the middle of you head to keep the braids from moving throughout the day.


Monday, February 6, 2012

crowned chasm

craving a quick updo?  think braids, and twist! one of our dhh fans requested this updo, after seeing it here on the Nasty Gal website.  Get yourself a sultry upswept 'do - we make so easy you can't abstain!


here is the updo inspo (and we die for the outfit, too...)


here's how we did it....
1. 
put hair into a low ponytail.
2. 
braid into two braids. (within the ponytail)
3. 
take the right braid, and pull it up to the left side of your head. Let your hair follow around to the crown of your head and pin it in place. 
4.
now, take the left braid and loop it underneath the braid that is pinned on the left side of your head. pull it around the top of your head, to the right, and secure in place with bobby pins. you should end up with a braided crown, complemented by a sweet updo in the back. You can maneuver your braids to alter the height and location of your updo after you have pinned in place. We liked the bottom braids closet to our neck as seen in the inspo pic and the one below. 


Keep playing to find perfection. 


final product:
not only is this style easy for fall, perfectly accessorized with a scarf, it is perfect for a sweet spring wedding or even a beach day!


tips n' tricks:

  • tighter braids will allow for a more polished look.  we opted to try a messier look, closer to what we would normally wear. imperfection can be perfection...
  • layers can make the braids tricky: use bumble&bumble grooming or defrizz (pictured below) to help smooth ends and make braids stay. 

have a request? send it to us at dhh@dirtyhippiehair.com!

Friday, February 3, 2012

Make me a DHH Darling!

While Tee's coccyx is mending its broken heart, we decided that it was time for our first ever DHH makeover.


Our First Victim: Isa
Isa is a full time worker, a full time mamma, a part-time student and a lover of E!News (which is why we get along so well!)


Prior to her DHH transformation, Isa had become accustomed to a decade of blossomed highlights and long locks. She never disliked her hair but secretly wished for just a little more POP. 


We chose a deep red for Isa for several reasons: 
1. Isa vaguely mentioned her love for red. 
2. She loves to dress boldly- wearing animal prints, colors, and rainbows of shoes.


Not only is it important for your hair color to fit your personality, but it also has to correlate with your complexion and style. Isa has FLAWLESS porcelain skin. Toning Isa's hair with a darker color would really make her skin pop and her checks glow--it only seemed fitting to dip her hair in a beautiful ominous strawberry. Her hair was trimmed with the addition of added long layers (so the hair could style nicely with only an air dry) which framed along her face (and optional side swept bangs). We added some curls to show Isa (who argued her hair would NEVER hold curls) that a little dye and a little style can brighten up any tired day. 


Now, she has a classic yet bold look which accentuates her style and genetics. 


What do you all think? 


**BIG Thanks to the wonderfully talented JAYME SANCHEZ for the color and cut! You can contact us at DHH@dirtyhippiehair to be the NEXT hair makeover OR to see if Jayme is in YOUR area!**

Wednesday, February 1, 2012

Bangin' Betty

No blandishment or encomium could compare to the banded beauty that is Bettie Page. Although classic and careless, Bettie is more than just a beauty-- she was a risk taker,which is why we love her.


Feel a little frisky and add a daily Bettie in your life. Here's a 5 min favor to get the look of this 50's icon.


1. Grab a small section of hair from the crown of your head. 
2. Start curling your hair under using your fingers. It may be easier to add a bit of product. We used Bumble & Bumble's Sumo Tech on the ends of Asher's unruly layers. 
3. Pin in place! This can be tricky. What you will want to do is first pin inside of your new faux bangs to make them stay together. Then you want to pin the ends of your rounded beauties to your actual hair. I think we used around 5 bobby pins. 
4. Finish with a headband, scarf or ribbon! 

Thursday, January 26, 2012

rainbow regalement

the perfect proximal permutation to your ombre, why not add a little color and spice it up? Our dhh fans have been asking how to get this on their head, so here's a quick and easy tutorial!
1. 
I started with my hair already "ombre'd", so that the ends were already bleached/lightened from a few months ago.  if you are starting out without lighter ends, note that you will need to first use a highlighting kit, and use our tutorial here to lighten up those ends, so that your color will display properly.
2.  
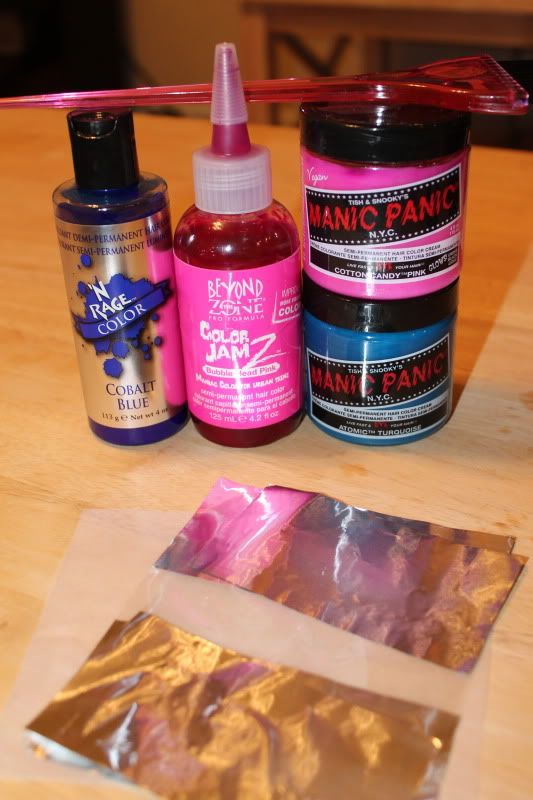
here are the tools you will need: a color brush ($1.99 from your local beauty store), highlighting foils (I got a package of 35 for about $3), and then your color!  I chose to get four shades - two blue and two pink.  i got a light and dark blue, and then a light and dark pink, so that i could create a blending effect.  feel free to get creative and use whatever colors strike your fancy! i cut my foils in half, since i was only highlighting the ends, and it seemed to make them much easier to work with.  i also got these pretty sweet foils that allow you to see the color through the foil. 
3.
to start, i sectioned my hair off with a clip as i would when straightening or curling it. i started with the bottom layer and worked my way upwards.  i did one color at a time, so that i could use the same brush the whole time and used random selection to chose what pieces would be painted blue or pink. 
4.
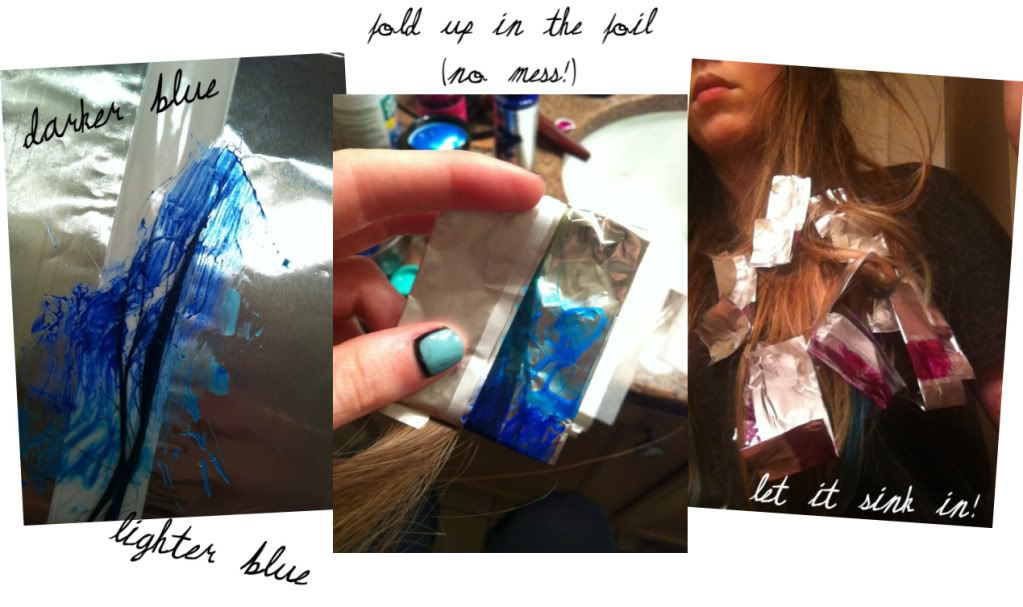
i randomly chose pieces that i wanted to highlight, of about the size you see above, and set them on the highlighting foil.  starting with the light blue dye, i then used the brush to add the color at the top of the piece (closer to my roots).  i then added the dark blue dye starting from the tips/ends, blending the two together where they met. i used more of the darker dye on each tip. (the great part about this is that it doesn't have to be perfect - messy lines look much better than straight ones here! i also tried to make sure i was putting about the same amount on each side, so as not to be lopsided in color. )
5.
i continued this around my head, pulling the hair forward to make it easier to reach.  this way, i could get the back of my head as well. 
6. 
i left the blue dye in for about 45 minutes, then rinsed.  (my hair takes longer to pull color - the instructions said about 30 minutes) 
7.
i waited for my hair to dry, then repeated the process with the pink.  
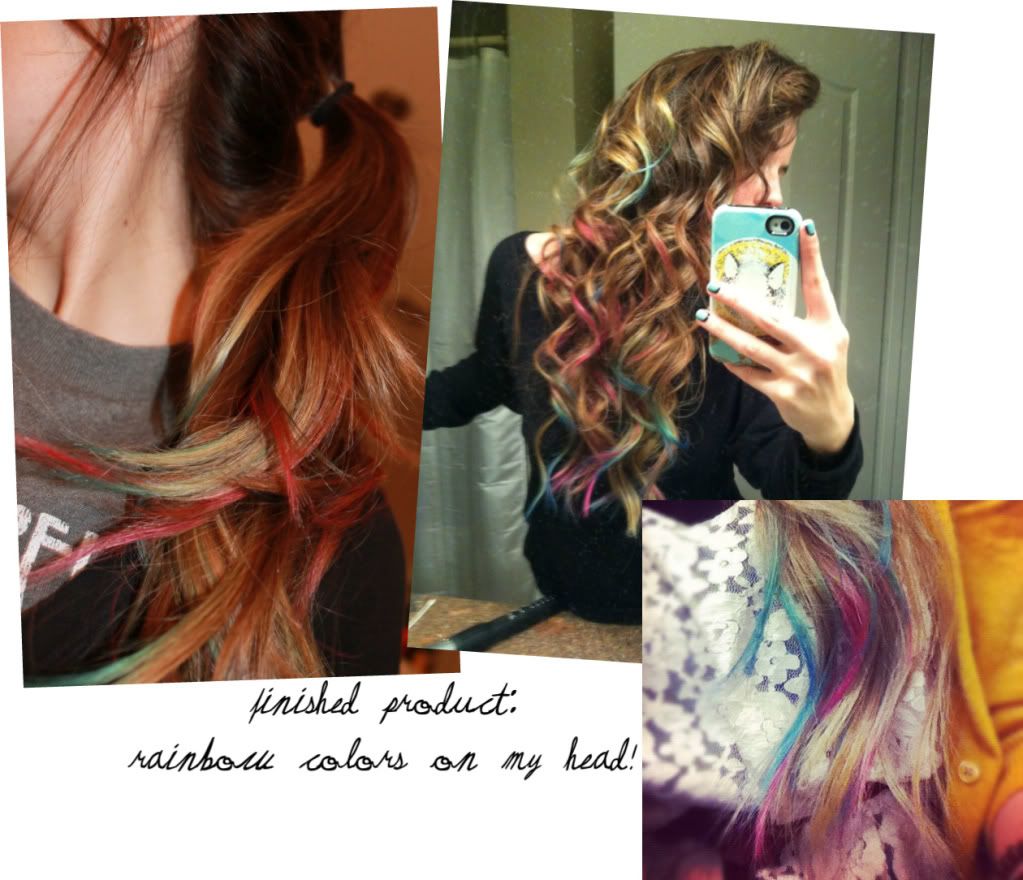
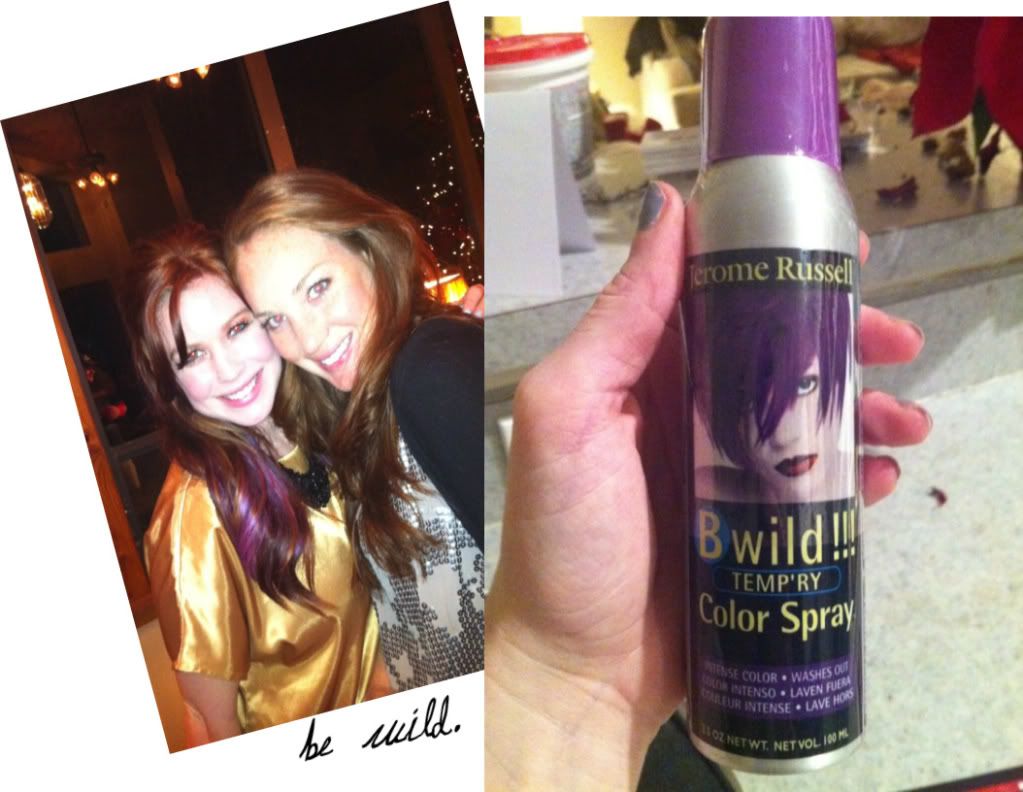
don't be timid about this hairdo (its goof proof!) - the semi and demi- permanent dyes wash out in 10-12 washes.  if you want to preview this look on yourself before you go for the real thing, try out a spray in style, found in most beauty stores in the same aisle alongside the color dyes! Check out the Purple Spray Tee used. This was a one time wash out. 


Tuesday, January 24, 2012

X-ccentric

Wellccommmee back!


Here is our continued updo how to for short or curly hair (dont fret long haired lover, these looks will work for you as well.)


1. Think 4 corners, you will make 4 sections of hair.  Start by Pulling your hair half up, half down and split that section into two, the bottom half will do the same. 
2. Take the first section and braid the hair. Stretch the braid to its opposite corner and pin in place. 
3. Take the bottom section of hair under the section you just did. Braid this piece, stretch across to opposite section of head. Your hair should form a X. 
4. Take the remaining section of top hair and braid it, stretch it across to the opposite side. Pin in Place. 
5. Take the last section of hair, Braid it, stretch it across and pin in place. 

Tuesday, January 17, 2012

Up and Out

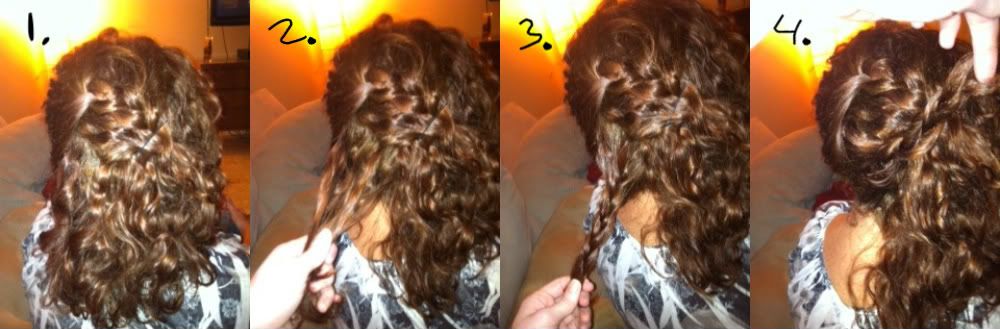
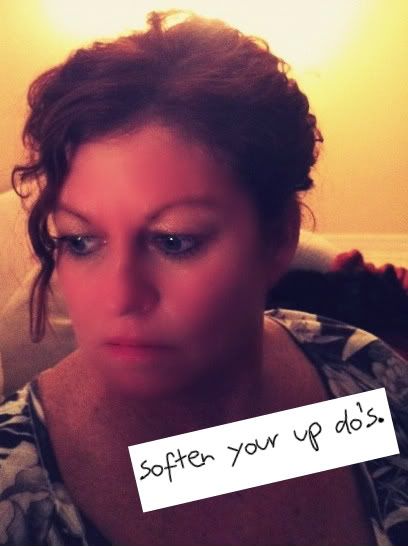
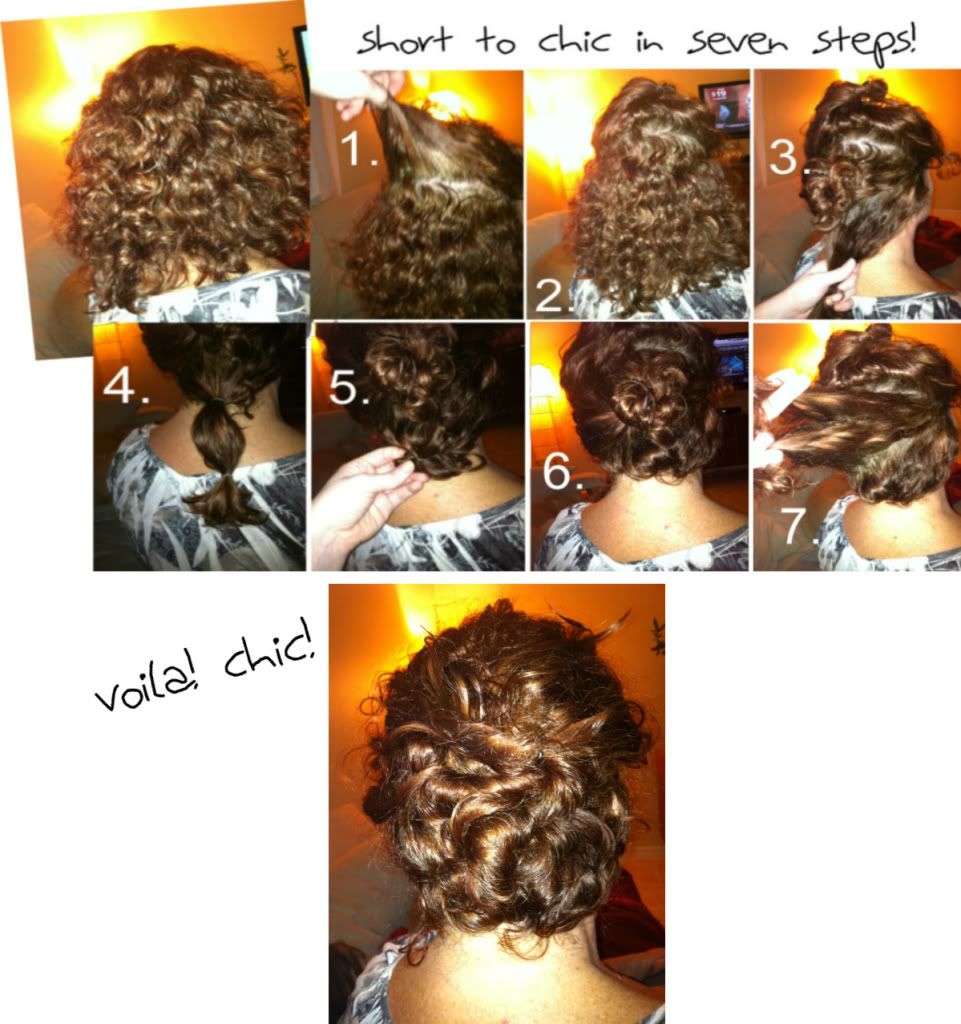
Several of our readers have recently requested easy updos for short and curly hair..and like the loyal Hippies we are...we have delivered.


Check out this  easy exercise below.


1,2,3. Youre going to part your hair in three sections: A top, Middle and Bottom.
4. Put the bottom section in a Pony Tail, as you will be working with this section first.  Add another hair tie in the middle of your pony tail.
5. Take the end of your pony tail and roll it under. Having the rubber band in your pony tail will make it easier to roll under.
6. Clip in place when you are done.
7. Take the Middle Section and split into two sections. Next, and what is NOT pictured here (we do apologize) split those two sections that were once your one middle section down the middle. So, you would now have 4 sections. Start with the bottom left section and twist the hair across to the right side of your head. Pin in Place. Do the same with the right lower section. Pin in place. Finish twisting the top sections of the left and right sides. Also Pin in Place. Take the top section of your hair and just pin that in place as it is in order to keep volume on the top of your head- as this top layer is generally shorter than the others.


Keep in mind that you can do as many or as little twists as you want depending on your hair type- some may have thinner hair than others. All this style requires is a simple twist and pin!


Tune in next Tuesday for another Short and Sassy do! 

Thursday, December 22, 2011

olive oil: an obscure oblectation

olive oil... you probably cook with this enchanting elixir, but little do you know...it can be slathered onto your hair, lips, and skin for a bevy of brilliant uses.  


asher: from damaged do to haughty hair...


asher's hair is super long and has been dyed quite a few times recently.  a great culprit of damage is the ever fun, but ever damaging blonde dye.  if you dye your hair constantly as we do, (there may be few that change their hair color as often as tee...) do what asher does, and mix a teaspoon of olive oil into your weekly hair masque.  we recommend the creme de cocoa masque by bumble and bumble. On a tight budget? Dont stress it, adding a cap full of olive oil to a palm full of the cheapest conditioner will still do the trick! Leave it in your hair for 4 minutes after a shampoo and continue with your normal rinse. Do this three times a week to revive those thirsty strands. 


tee: for lips as luscious as tee's, use olive oil on your lips. 


It's not worth hiding it, my lips are large. With any change of season, dehydration, sleep deprivation, or illness my lips have the tendency of swelling.  Unfortunately, by swelling i mean double and tripling in size (just ask my friends). Thus, the causal effect leaves my lips dry and chapped. Instead of using your average chap stick that will be sure to eventually dry your your pout out even more, i slap a finger full of olive oil on my lips. Not only does this provide my lips with a beautiful and moisturized shine, but it lasts hours...and my boyfriend isn't shunned away from dropping a few kisses. 


I also have a terrible habit of leaving mascara on for days. Yes, Im a light sleeper. Nearing day two or three, my lashes start clumping and im forced to scrub my eyes and reapply. However, scrubbing can be quite damaging on your lashes. So, afterwards i spread a thin layer of olive oil on my lashes just as if I was putting on eye liner. This helps keep your lashes strong and thick. 


Tee's Ma: (for anti wrinkle and flawless skin)! 


Yes, this dear angel is 51 and without a wrinkle! She's never had a facial, chemical peel, fillers or botox! Her secret? Olive oil. Sure, a gift of genetic makeup may take place, but can you resist this recipe for flawless skin?


How does she do it? After washing her face, my mom applies olive oil in her hands and rubs it into her face using circular motions. She applies more coats on her trouble areas (in between her eyes and where her ears meet her neck). She lets this soak over night twice a week and rinses with cool water in the morning.


She also applies this all over her body and down her neck (as your neck ages 7 years faster than your face. Take note, ladies!). 


Ive recently adopted this regiment into my daily routine after i was struck with the deathly hallow of turning 25. I cannot tell you how many compliments I have received on my skin just in the past week. Olive oil will be SURE to give you that glowing, dewy fresh face that we all want and deserve.


Ok- so you might have sensitive skin and are hesitant to the idea of lotion and oils? Well, olive Oil contains a natural moisturizer called squalene. Sebum is what makes our skin too greasy and frightful. However, squalene has the miraculous ability of regulating its secretion. This means that, when use on your skin, the sebum will be reduced and you will experience less skin problems than before. Blemishes will be nothing but a bad dream after you apply plenty of olive oil.


Still not convinced? 


Among the natural antioxidants to be found in olive oil, there are A and E vitamins, as well as some polyphenols, well known for their ability to postpone aging. By taking out free radicals, freed in the body, these special agents are guaranteed to prolong your life, as they contribute to cell repair. The same thing is valid when you apply olive oil on your skin. As you may well know, our skin is many times exposed to pollution and other factors that cause it to grow older. By caring for skin with olive oil, you will limit the actions of these factors, and enjoy a beautiful skin for a long time.

Thursday, December 8, 2011

How to: Fish Tail Braid

Take your traditional Braid a Step further and make it fishy! Follow this easy tutorial here:


One fish, two fish, cute fish, blue fish! 
Fish on the runway:

Monday, November 14, 2011

Bangs as Blandishments!

Bangs. 


Yes- we are both advocates of these mangy little guys. However, our just trust in the shag does not go unwarranted. Bangs can easily polish any ruff stone and always leaves room for diversity and modifications to your look. 


For the one who is always itching a makeover (myself included)- a quick trim above the eyes, can make you feel brand new. 


Contemplating bangs? Check out our bang styles for ideas..


Round Face: 


ROUND FACE SYNDROME-While I have virtually sported every hair color and style- I find Bangs will always comfort my brows. Bangs are great for lengthening round faces and making them appear to be thinner. I do LOVE short across bangs-however, time and time again has proved that longer side swept bangs work best to thin out this shaped face. PS- This is me smiling. So jovial.


Heart Shape or long faces: Fear not! Bangs are the cutest accessory on these fab faces. Short Shabby bangs are adorable but long swept side bangs work wonders as well. 


Lazy Bangs
Trying to grow out your bangs?  Or just don't feel like styling day three of those little pests? Try out some of these easy dos to hide your bangs. 

1. Grab your bangs. 
2. Twist them
3.Grab a new section of hair on the side (pull from your ear as if you are doing your hair half up-half down)
3. Twist again with the new section of hair. 
4. Keep grabbing a new section of hair and twisting until you each the middle of your head. 
5. Bobby Pin in place. 


This is another look you can do using the Twist method from above and the two-strand braid you learned here 5 Minute Braids . We did the braid above and below a little looser than we normally would to give her hair a romantic and effortless edge. 


Hide your Bangs in a Waterfall....Braid. 


1. Clip your bangs to the side with a bobby pin. 
2. Grab a section of hair. 
3. Split that section into two strands. 
4. Cross them over
5. Grab a New piece of hair from the top
6. slide that strand into the middle of your two crossed over pieces. 
7. Cross the two pieces once more. 
8. Add a New strand in, cross again, repeat until your braid is as long as you want. 
9. Add a Pretty bow for a finished (bang-less) look. 


Don't have bangs? Want them momentarily? 


Use a headband and a deep side part to test your likes of the newly short hairs. 


And look! You already learned this do below, Here!